My hydroponic chili farming 2022.
New year, new chili farming! In a previous article I wrote about my first attempts at hydroponic farming of chili and there were some changes I wanted to make for this year. In this article, I will try to show every step of that journey.
 The plan for 2022
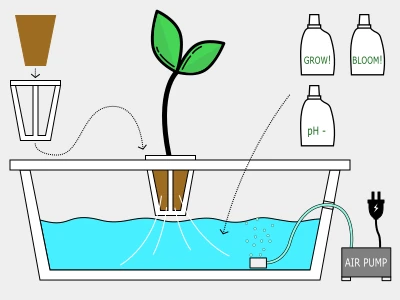
Basically, I want to keep the general hydroponic system (passive) from last year, but add an air pump as shown in the image. I will also use different types of nutritional solutions and adjust the pH value if needed. I may supplement with appropriate lighting later in the season, but there is nothing that I think will be needed initially.
Another change is that I have chosen to have several smaller "pots" with only one plant instead of a large "pot" with several plants. This is to be able to move around the plants when they are small so I can find the best location for them here at home. I can also adjust nutrition and the like for each plant independently of the others. Admittedly, there will be significantly more places to fill with water, but I do not see that as a particularly big problem.
DYI boxes
Since I wanted individual boxes for each plant, I had to put on the MacGyver hat and construct a little. It turned out to be quite easy and here is a quick explanation of what I did.
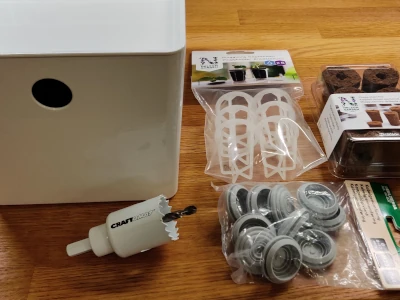 Part of what is needed
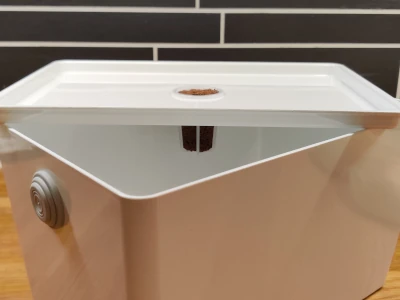
Step 1 was to find suitable boxes for what I was looking for. It turned out that IKEA had some that suited me perfectly. The white box is called "KUGGIS", comes with a lid and is available in a few different sizes. I chose the one that is 18x26x15cm as it fits perfectly with what I want to use it for. It holds quite a lot and when I tested I had to refill with almost 4 liters to reach up to the plug.
Step 2 was to supplement with a few other things such as a rubber plug (cable gland 25mm from the "biltema"), hole saw (35mm), plug basket and cultivation plug. There is an air pump with several oxygen stones (one for each pot) and accessories such as hose and T-couplings at a later stage, but I should be able to retrofit this relatively easily.
 Almost finished box
Once I had everything in place, I just had to start making the hole in the lid. Here I used a hole saw that was 35mm, which means that the plug basket I use (which is a little wider at the top) will rest prefectly on the lid. For plug basket, I chose to use the same basket used in the "Harvy" system as I have a store nearby that sells these. The cultivation plug was thus from the same manufacturer so I know that they fit well in the plug basket.
Then it was just a matter of plugging in the hole on the side of the box. Here I used a cable gland of rubber (25mm) that required a little persuasion. I will then punch a small hole through this rubber plug where the air hose from the pump enters.
After assembly, most things were in place. Pump and hose will come later, as I said, but there is nothing that prevents me from starting to put the seeds already. So 2022-01-23 I put seeds into a few boxes so that they start to germinate as soon as possible.
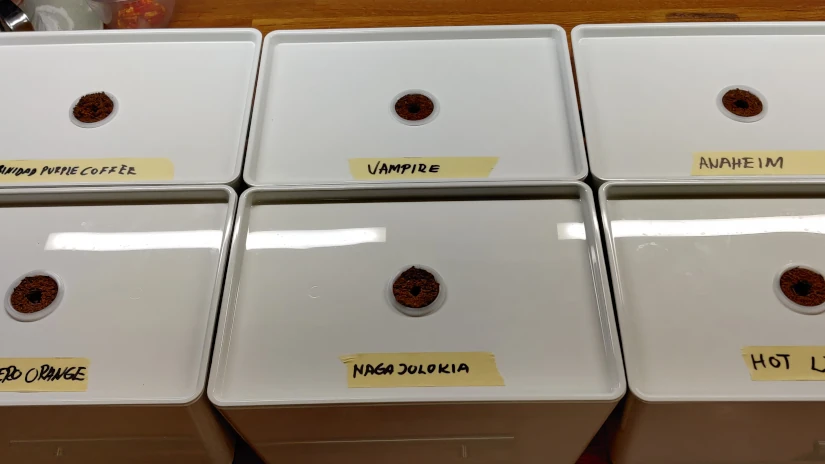
I planted the following seeds: naga jolokia (ghost pepper), red and orange habanero, anaheim, trinidad purple coffee, vampire, hot lemon and bulgarian carrot in each cultivation plug (only one seed in each plug). Then it was just a matter of filling with water and nutrients so that the level of the liquid was high enough to reach the plug so that it began to absorb water and nutrients. The level when everything has picked up speed will be lowered to below the bottom of the plug, but at this stage the liquid should just reach up to the plug.
Now it's just a matter of waiting to see what happens and I will update this text when the first plants start to recover and I install the air pump.
Air pump and nutrition
A week later and what I ordered has now appeared. Air pump with accessories and the nutrition I will use was ordered from www.hydrogarden.se.
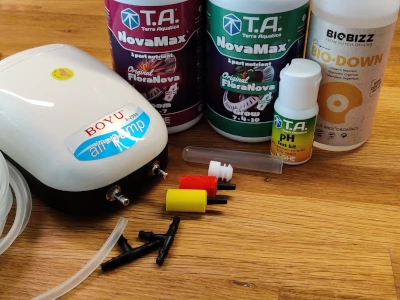 Air pump, nutrition and pH adjustment
What I needed to do now was just place the pump in a suitable place between the boxes and then measure and cut the air hose to the appropriate lengths. The idea is that one outlet on the pump covers 2 boxes so a T-coupling is needed on each hose. Then I had to create a small hole (4 mm) in the rubber plug that sits on the side of the box so the air hose could be pulled in and everything ended with mounting the oxygen stone inside the box.
I test drove it and there were bubbles everywhere - success. However, I will not put these on timer until everything starts to grow a little more. However, I see that most of the seeds have now started to germinate so that is a good sign - hopefully I will see more results next week but it is still early in the process.
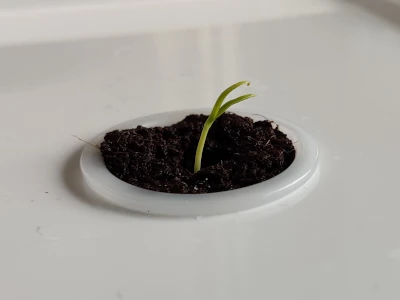 2022-02-06 Things are growing
An interesting thing I did not think of was that when I bought the oxygen stones, there was only a 3-pack of different colors available. These colors turned out to indicate how compact the stone was and thus how difficult the air passed and how large/many bubbles were generated. It led to problems if I combined the most compact with the least compact stone as it bubbled properly in one box, but hardly anything in the other. A few quick changes later, it was fixed and everything looks good to start later.
One more thing with the air pumps - they should be placed above the water level in the cultivation boxes and/or fitted with a non-return valve so that water is not sucked back into the pump.
Overall I thought it worked well. I had some little critters that sabotaged the crop a bit, but I got a lot of chili out of everything. When the plants got big, however, I discovered the problem that each box contained too little water, which meant that there were many small waterings. It got a bit boring to keep up with over time, so I made sure to work out a slightly different plan for next year.